8.0 KiB
For Developers
Debugging an addon
Please follow IDE setup guide at https://www.openhab.org/docs/developer/ide/eclipse.html.
When configuring dependencies in openhab-distro/launch/app/pom.xml, add all dependencies, including the transitive dependencies:
<dependency>
    <groupId>org.openhab.addons.bundles</groupId>
    <artifactId>org.openhab.binding.modbus</artifactId>
    <version>${project.version}</version>
    <scope>runtime</scope>
</dependency>
<dependency>
    <groupId>org.openhab.core.bundles</groupId>
    <artifactId>org.openhab.core.io.transport.modbus</artifactId>
    <version>${project.version}</version>
    <scope>runtime</scope>
</dependency>
<dependency>
    <groupId>net.wimpi</groupId>
    <artifactId>jamod</artifactId>
    <version>1.2.4.OH</version>
    <scope>runtime</scope>
</dependency>
Testing Serial Implementation
You can use test serial slaves without any hardware on Linux using these steps:
- Set-up virtual null modem emulator using tty0tty
- Download diagslave and start modbus serial slave up using this command:
./diagslave -m rtu -a 1 -b 38400 -d 8 -s 1 -p none -4 10 /dev/pts/7
-
Configure openHAB's modbus slave to connect to
/dev/pts/8. -
Modify
start.shorstart_debug.shto include the unconventional port name by adding the following argument tojava:
-Dgnu.io.rxtx.SerialPorts=/dev/pts/8
Naturally this is not the same thing as the real thing but helps to identify simple issues.
Testing TCP Implementation
-
Download diagslave and start modbus tcp server (slave) using this command:
./diagslave -m tcp -a 1 -p 55502 -
Configure openHAB's modbus slave to connect to
127.0.0.1:55502.
Writing Data
See this community post explaining how pollmb and diagslave can be used to debug modbus communication.
You can also use modpoll to write data:
# write value=5 to holding register 40001 (index=0 in the binding)
./modpoll -m tcp -a 1 -r 1 -t4 -p 502 127.0.0.1 5
# set coil 00001 (index=0 in the binding) to TRUE
./modpoll -m tcp -a 1 -r 1 -t0 -p 502 127.0.0.1 1
# write float32
./modpoll -m tcp -a 1 -r 1 -t4:float -p 502 127.0.0.1 3.14
Extending Modbus Binding
This Modbus binding can be extended by other OSGi bundles to add more specific support for Modbus enabled devices.
To do so to you have to create a new OSGi bundle which has the same binding id as this binding.
The best way is to use the ModbusBindingConstants.BINDING_ID constant.
Thing Handler
You will have to create one or more handler classes for the devices you want to support.
For the modbus connection setup and handling you can use the Modbus TCP Slave or Modbus Serial Slave handlers.
Your handler should use these handlers as bridges and you can set up your regular or one shot modbus requests to read from the slave.
This is done by extending your ThingHandler by BaseModbusThingHandler.
You can use the inherited methods submitOneTimePoll() and registerRegularPoll() to poll values and submitOneTimeWrite() to send values to a slave.
The BaseModbusThingHandler takes care that every regular poll task is cancelled, when the Thing is disposed.
Despite that, you can cancel the task manually by storing the return value of registerRegularPoll() and use it as an argument to unregisterRegularPoll().
Please keep in mind that these reads are asynchronous and they will call your callback once the read is done.
Once you have your data read from the modbus device you can parse and transform them then update your channels to publish these data to the openHAB system.
See the following example:
@NonNullByDefault
public class MyHandler extends BaseModbusThingHandler {
    public MyHandler(Thing thing) {
        super(thing);
    }

    @Override
    public void handleCommand(ChannelUID channelUID, Command command) {
        if (command instanceof RefreshType) {
            ModbusReadRequestBlueprint blueprint = new ModbusReadRequestBlueprint(getSlaveId(),
                    ModbusReadFunctionCode.READ_MULTIPLE_REGISTERS, 0, 1, 2);

            submitOneTimePoll(blueprint, this::readSuccessful, this::readError);
        }
    }

    @Override
    public void modbusInitialize() {
        // do other Thing initialization

        ModbusReadRequestBlueprint blueprint = new ModbusReadRequestBlueprint(getSlaveId(),
                ModbusReadFunctionCode.READ_MULTIPLE_REGISTERS, 0, 1, 2);

        registerRegularPoll(blueprint, 1000, 0, this::readSuccessful, this::readError);
    }

    private void readSuccessful(AsyncModbusReadResult result) {
        result.getRegisters().ifPresent(registers -> {
            Optional<DecimalType> value = ModbusBitUtilities.extractStateFromRegisters(registers, 0, ValueType.INT16);
            // process value
        });
    }

    private void readError(AsyncModbusFailure<ModbusReadRequestBlueprint> error) {
        // set the Thing offline
    }
}
Discovery
If you write a device specific handler then adding discovery for this device is very welcome.
You will have to write a discovery participant class which implements the ModbusDiscoveryParticipant interface and registers itself as a component. Example:
@Component
@NonNullByDefault
public class SunspecDiscoveryParticipant implements ModbusDiscoveryParticipant {
...
}
There are two methods you have to implement:
-
getSupportedThingTypeUIDsshould return a list of the thing type UIDs that are supported by this discovery participant. This is fairly straightforward. -
startDiscoverymethod will be called when a discovery process has began. This method receives two parameters:-
ModbusEndpointThingHandleris the endpoint's handler that should be tested if it is known by your bundle. You can start your read requests against this handler. -
ModbusDiscoveryListenerthis listener instance should be used to report any known devices found and to notify the main discovery process when your binding has finished the discovery.
-
Please try to avoid write requests to the endpoint because it could be some unknown device that write requests could misconfigure.
When a known device is found a DiscoveryResult object has to be created then the thingDiscovered method has to be called.
The DiscoveryResult supports properties, and you should use this to store any data that will be useful when the actual thing will be created.
For example you could store the start Modbus address of the device or vendor/model informations.
When the discovery process is finished either by detecting a device or by realizing it is not supported you should call the discoveryFinished method.
This will tear down any resources allocated for the discovery process.
Discovery Architecture
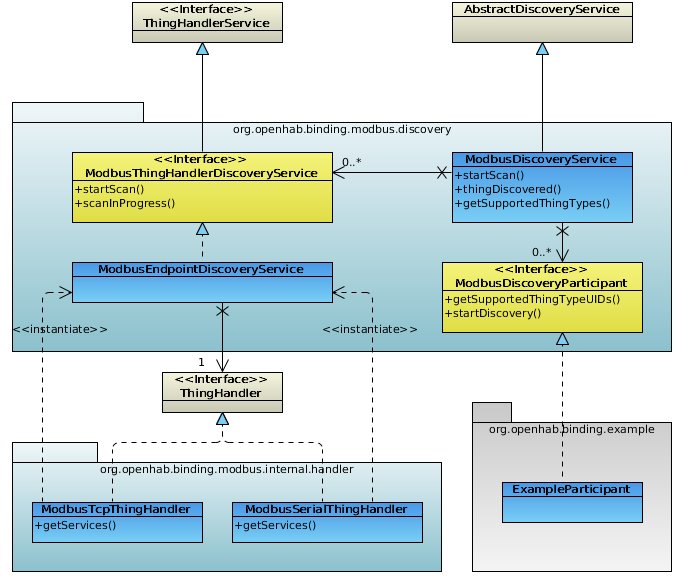
The following diagram shows the concept how discovery is implemented in this binding. (Note that some intermediate classes and interfaces are not shown for clarity.)
As stated above the discovery process can be extended by OSGi bundles.
For this they have to define their own ModbusDisvoceryParticipant that gets registered at the ModbusDiscoveryService.
This object also keeps track of any of the Modbus handlers.
Handler level discovery logic is implemented in the ModbusEndpointDiscoveryService which gets instantiated for each Modbus BridgeHandler.
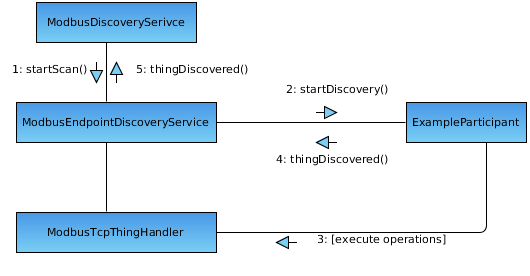
The communication flow is detailed in the diagram below:
As can be seen the process is initiated by the ModbusDiscoveryService which calls each of the ModbusEndpointDiscoveryService instances to start the discovery on the available participants.
Then a reference to the ThingHandler is passed to each of the participants who can use this to do the actual discovery.
Any things discovered are reported back in this chain and ultimately sent to openHAB core.

